Oculus Quest 2 is one of the best headsets for first-time VR users, and it’s bringing plenty of new users into VR for the first time. Here’s seven tips worth knowing right out of the gate to improve your experience.
1. Turn on Passthrough Background & Passthrough Shortcut
‘Passthrough’ is when you use the Quest 2 cameras to look outside the headset. You will have seen this when you first set up the device. And while it might seem novel at first to have your ‘virtual home’ be some sci-fi apartment or fantasy landscape, I can tell you now that using the passthrough view as your background actually makes the headset much easier to use.
That’s because you can put on the headset first and then easily see where your controllers are to pick them up, instead of blindly feeling around. This is also much nicer than putting on your headset while the controllers are dangling from your wrists by their straps.
Also, whenever you go back to your home space you’ll be able to see your relative position within your playspace boundary, allowing you to move back to the center in case you’ve wandered toward the edge (don’t be the next person to post a picture of the TV you broke while playing a VR boxing game).
And if you want to be able to quickly peek outside your headset, you don’t have to bother taking it off. With Passthrough Short enabled, you can double-tap on your headset to instantly toggle the passthrough view on and off to see who is calling your name or where to set your controllers down before you take off the headset. Here’s how:
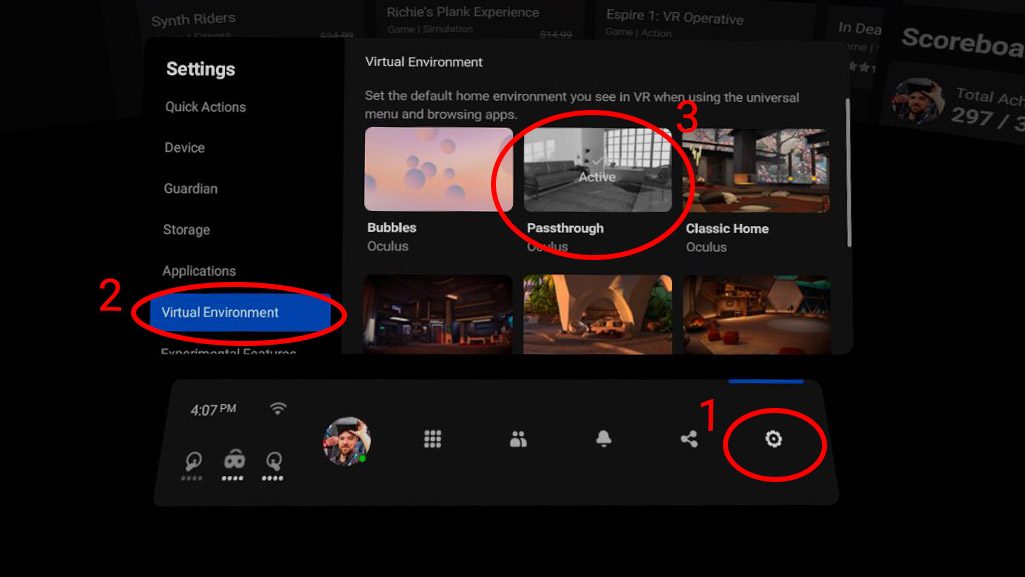
Turn on Passthrough Background
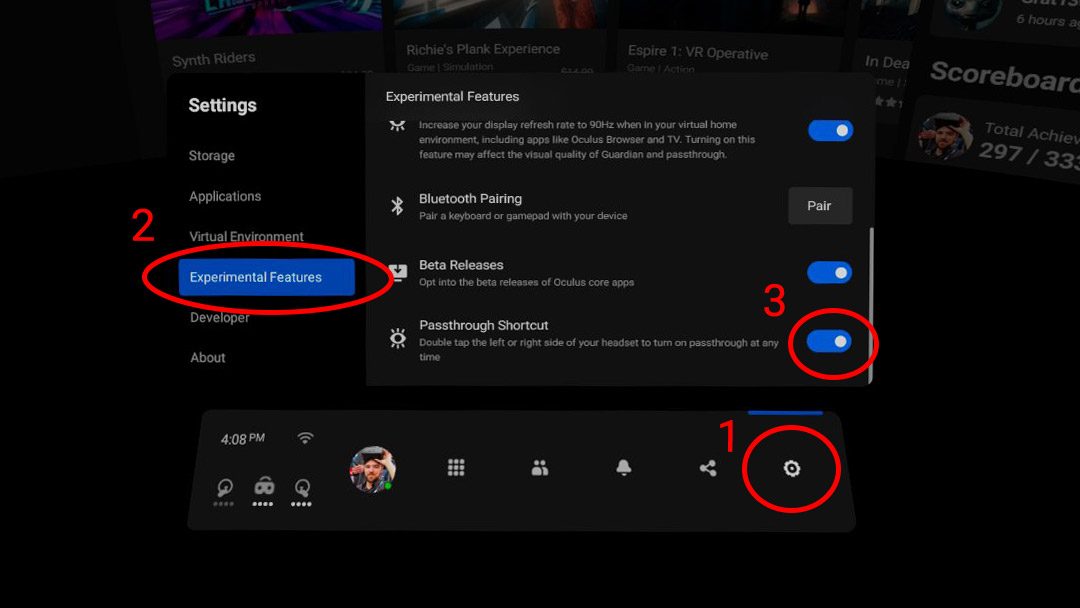
- In your headset, bring up the Quest menu by pressing the Oculus button on your right controller. Find the Settings section (gear icon).
- On the left of the Settings section select ‘Virtual Environment’
- Now select ‘Passthrough’ as your virtual environment option
Turn on Passthrough Shortcut
- In your headset, bring up the Quest menu by pressing the Oculus button on your right controller. Find the Settings section (gear icon).
- On the left of the Settings section select ‘Experimental Features’
- Now scroll until you find ‘Passthrough Shortcut’ and flip the switch
When you return to your virtual home space you’ll see that you’re now just standing in your room with the Quest menus floating in front of you. Any time you can’t see the outside world, double-tap the side of your headset with your hand or controller to instantly see into the real world. Double tap again to return to VR.
2. Use Voice Commands to Navigate Quest 2 & Launch Apps
Voice Commands on Quest 2 are often the fastest and easiest way to navigate through your headset’s menus and launch games. Rather than fumbling through the app list, you can ask your headset to “launch Beat Saber.” Rather than digging through the Settings menu, you can ask “show me Guardian settings.” And rather than searching for a new game by typing the name into the search bar, you can say “search for The Walking Dead.” Here’s how:
- In your headset, bring up the Quest menu by pressing the Oculus button on your right controller. Find the Settings section (gear icon).
- In the Quick Actions section, click the circular Voice Commands icon to the right of the microphone (see photo below for the icon in question).
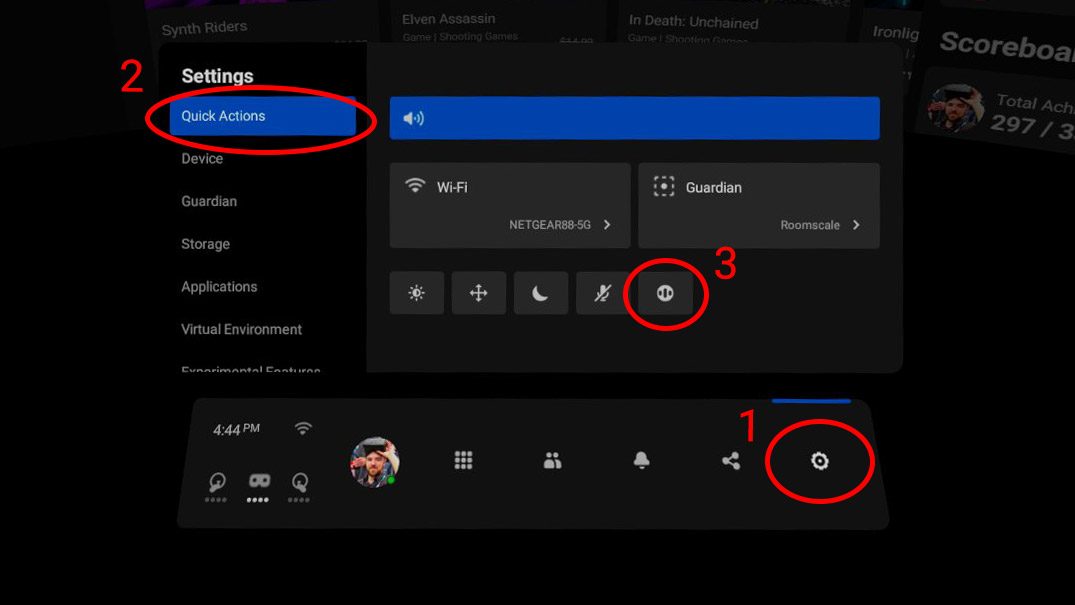
This will launch the Voice Commands setup and teach you what you can say. Once setup is complete, just double-tap the Oculus button on your right controller to trigger your headset to listen, then ask away!
3. Record, Stream, or Cast Your VR Gameplay on Quest 2
With something as cool as VR, it’s natural to want to share the experience. Luckily Quest 2 has many sharing options built right in. You can record videos of your gameplay, take screenshots, cast a video to your phone or TV, or even stream to viewers online. Here’s how:
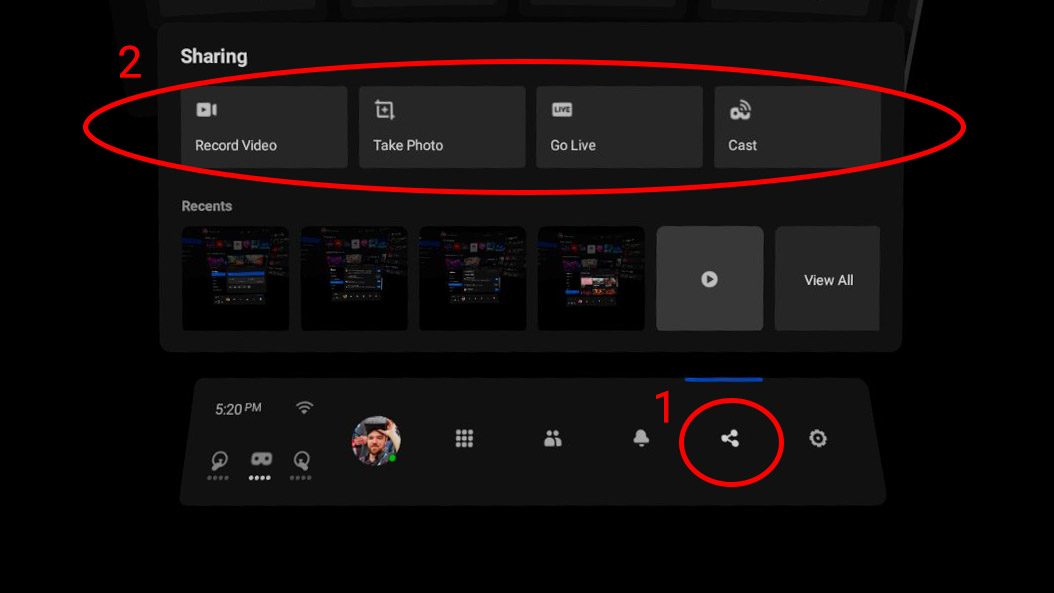
- In your headset, bring up the Quest menu by pressing the Oculus button on your right controller. Find the Share section (three dots connected by lines icon).
- At the top of the Share menu you can now choose between Record Video, Take Photo, Go Live, and Cast.
You can even use the Voice Commands (that we shared in tip #3) to say “record video,” “take screenshot,” “cast,” or “stream” to quickly do any of these actions in the midst of gameplay.
Casting allows you to stream video of your experience to local devices. You can cast to your smartphone through the Oculus smartphone app. You can also cast to any compatible devices on your network like a TV with Chromecast.
Go Live allows you to stream your Quest 2 experience out to the internet, but unfortunately you can only stream to Facebook.
Recorded videos and captured photos are stored on the headset, you can access them by clicking the ‘View All’ button in the Share menu. You can also plug Quest 2 into a computer to download videos and screenshots for editing and sharing.
4. Upgrade Your Headstrap—You’ll Thank Us Later
If you’re happy with your Quest 2 and plan to use it frequently, we highly recommend the official Elite Strap or Elite Battery Strap accessories to improve comfort.
The soft strap that’s included with Quest 2 is one of the worst on any Oculus headset to date. It does a poor job of distributing the headset’s weight. The Elite Strap accessories are rigid and offer a counterweight to better balance the headset. With better balance, you don’t need to tighten the strap nearly as much to keep the headset in place, sparing you from discomfort and the unsightly ‘VR face’ after taking off the headset.
Get the low-down in our full review of the Quest 2 Elite Strap accessories.
5. Avoid Direct Sunlight in Your Lenses or Risk Ruining Your Quest 2
This one has been catching unlucky VR headset users off guard since the early days. Quest 2 is no different.
If you let direct sunlight stream into the lenses for a long period the lenses can focus the light and burn a hole in the headset’s display, permanently damaging it (much like you can use a magnifying glass to focus sunlight enough to burn a hole in a piece of paper).
Make sure you don’t leave your Quest 2 sitting out with its lenses facing windows.
If many people use the headset, you might want to consider making it a ‘rule’ that it gets put away in a closet, drawer, or under a dishcloth to prevent anyone from accidentally leaving it the wrong spot for sunlight damage.
6. Check out Experimental Apps Through App Lab
While Oculus only allows select apps into the main Oculus Quest store, you can easily install early and experimental apps, as long as you know where to look. Oculus App Lab allows developers to officially distribute their apps on Quest outside of the main store. Installing them is as easy as having the link to the app, then clicking the button to install the app to your headset. But where do you find them?
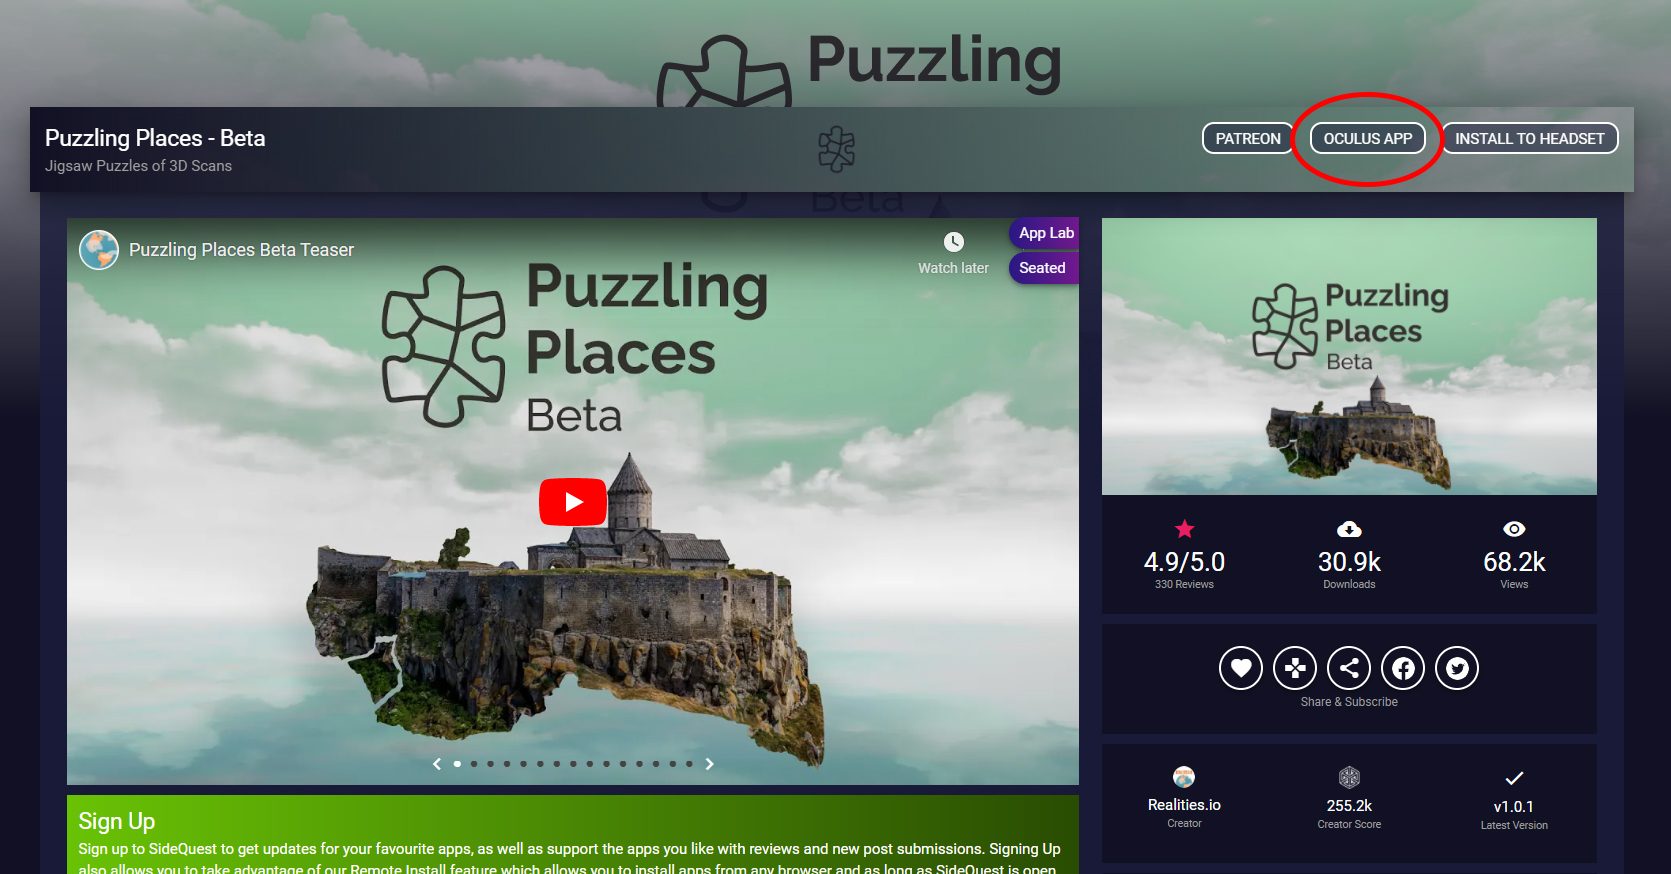
SideQuest is a popular alternative to the official Oculus Quest store. While many of the apps on SideQuest require a more complicated ‘sideloading’ method, SideQuest also lists the easier-to-install App Lab apps in a special section. Here’s how to find and install them:
- Browse the App Lab section of SideQuest
- When you find the app you want, click the ‘Oculus App’ button at the top right of the page, you’ll be directed to the app’s official Oculus page
- Click the blue button to buy or install the app, then it will appear in your Oculus library like any other app
7. Check Your Privacy Settings

Oculus is Facebook company and all Quest 2 users are required to sign in with a Facebook account in order to use the headset.
It’s a worthwhile exercise to double check your privacy settings so that you understand how your activity in the headset is seen by others. You can easily access the settings in the Oculus Privacy Center.
Here’s the settings you can control and what each does:
- Who will see your activity on Oculus?
- This controls how your current activity in VR is displayed on your profile (like which app you’re using). If you don’t want anyone to know what you’re currently up to in VR, change this to ‘Only Me’.
- Who can see your friends list on Oculus?
- This controls who can see the people you are friends with through your Oculus profile. If you don’t want anyone to see who your VR friends are, change this to ‘Only Me’.
- Who will see your Facebook name on Oculus?
- This controls which name people will see associated with your Oculus profile. Depending upon your setting, people may see your Oculus username or the first and last name of your Facebook profile. This also controls whether or not people can search for your Oculus profile by your Facebook name. If you don’t want anyone to see your real name in VR or be able to find your Oculus profile with your real name, change this to ‘Only Me’.
You can also see much of the data that Facebook collects about your VR activity; it’s worth browsing through this info to understand what kind of information is being stored about your activity in VR. To see the info, browse to the View Your Information section of the Oculus Privacy Center.
Quelle:

